Official Manual / First Steps
Import a Shadowrocket Subscription
and Connect for the First Time
Follow this order: add details → choose a mode → connect → verify → troubleshoot. Start with an existing connection you can test, then explore rules and settings one at a time.
Interface labels are kept in English, with explanations in parentheses where helpful. Images are official App Store screenshots to help identify each screen. Fields and layouts can vary by protocol, device, and app interface; follow what you see in the app.
Step 01 / Prepare a Connection Entry
Add Server / Subscribe: Add a Server or Import an Existing Subscription
First, identify whether you have a subscription URL or individual server details. They go in different places—don’t enter a subscription URL in Host.
Have a Subscription URL? Select Subscribe
On Home, open Add Server. You can usually tap the add button in the top-right corner or use Add Server in the list. Open the Type menu and select Subscribe. The form should switch to subscription fields rather than manual server fields such as Host and Port. Once Subscribe is selected, enter your full subscription URL in URL.
- Copy the original subscription URL from your provider. Check that the beginning and end are intact, with no extra spaces, line breaks, or explanatory text copied from a chat.
- Enter the URL in the Subscribe form. Add a note to help identify it if needed, then tap the Done or Save button in the top-right corner.
- Return to Home and wait for the subscription to load. Check whether server entries appear in the relevant group. If the group appears without any entries, check for an error message before trying to add the same URL again.
Subscription URLs often contain credentials, so protect them like passwords. Don’t post a full URL on a public page, in a screenshot, or in diagnostic logs. You don’t need to submit a URL here. A webpage address that opens in Safari may not be a subscription URL that Subscribe can import.
Have Server Details? Enter Them According to Type
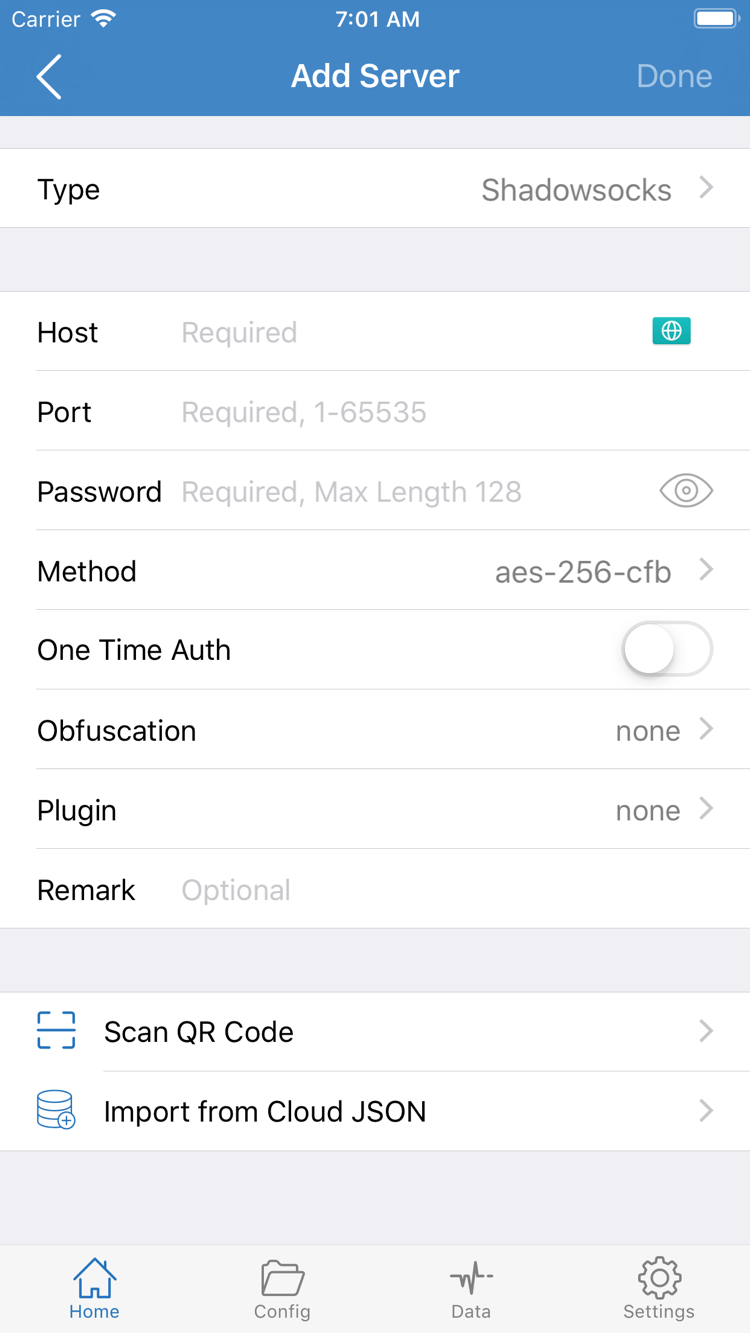
If you have a host, port, and authentication details, select the matching Type in Add Server. Fields vary by protocol, so don’t guess the Type based on a password alone. In the form shown in the official screenshot, enter the server address in Host and the port number in Port. Password and Method must match the original details. Other types may require additional identity, transport, or TLS fields.
A host might look like example.com. This shows a domain format only; it is not a working server. Don’t enter a full URL with a webpage path in a field that accepts only a hostname, or treat parameters from a subscription URL as server credentials. Leave options you haven’t been given at their current values. If a specific parameter is required, check the details from your existing service provider.
If you already have a QR code, use Scan QR Code in Add Server, then verify the Type and server details. Import from Cloud JSON is for compatible data formats, not a general way to import any subscription URL. After saving, return to Home and confirm the entry appears before choosing a routing mode. “Saved” means the details were entered; it does not confirm the connection works.
Step 02 / Choose How Traffic Is Handled
Global Routing: Config / Proxy / Direct
A server entry tells Shadowrocket where to connect. Global Routing determines how connections are handled. Check both separately.
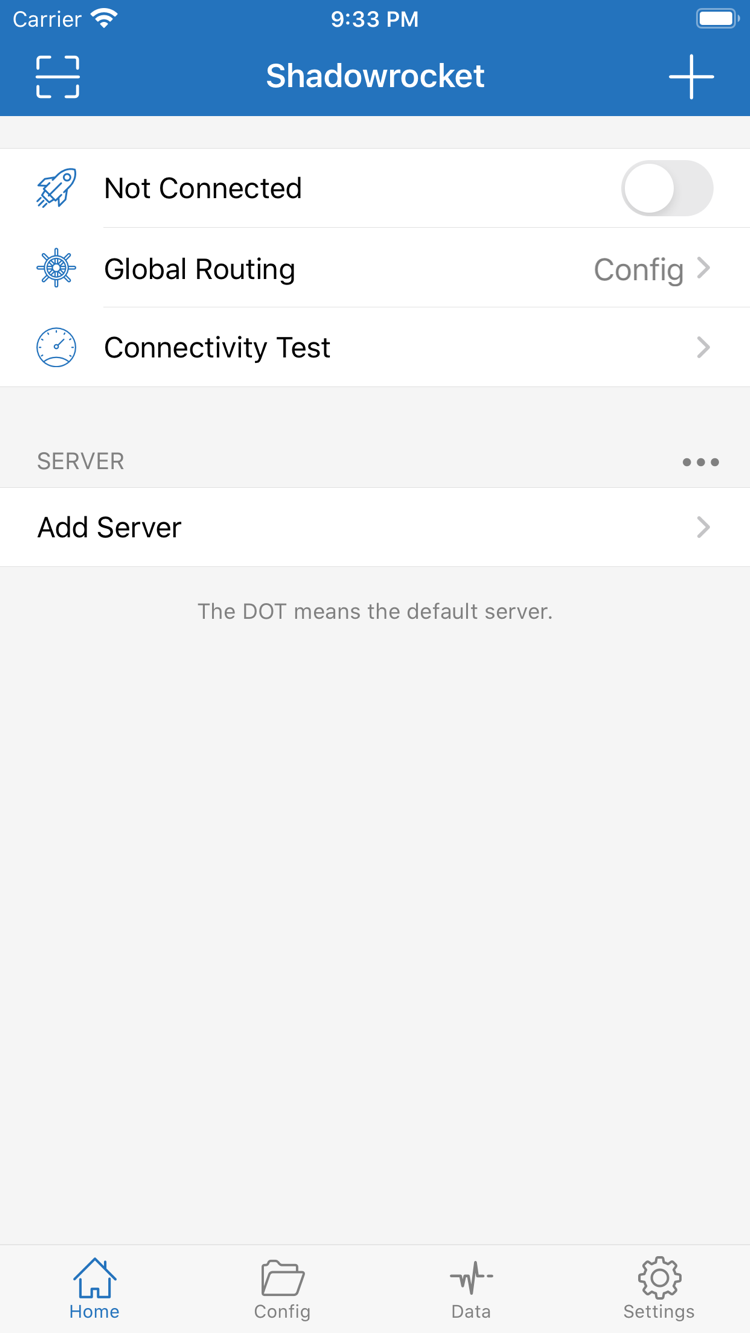
Return to Home and tap Global Routing to see the current mode. Note your current selection before changing it for a test. Importing a subscription and configuring routing rules are not the same thing: subscriptions typically update server entries, while configuration files in Config can contain rules and other settings. They serve different purposes.
- Config: Handles traffic according to the rules in the selected configuration. Use this mode for everyday routing, but first check which configuration is active and how it is expected to handle your destination.
- Proxy: Routes connections handled by the app through the selected proxy. For an initial server check, this mode can temporarily reduce variables introduced by rule-based routing. It doesn’t replace checking the server details or network.
- Direct: Routes traffic directly, without a remote proxy. Use it to compare with your regular network behavior, not to determine whether a remote server connects successfully.
Before Using Config, Check the Active Configuration
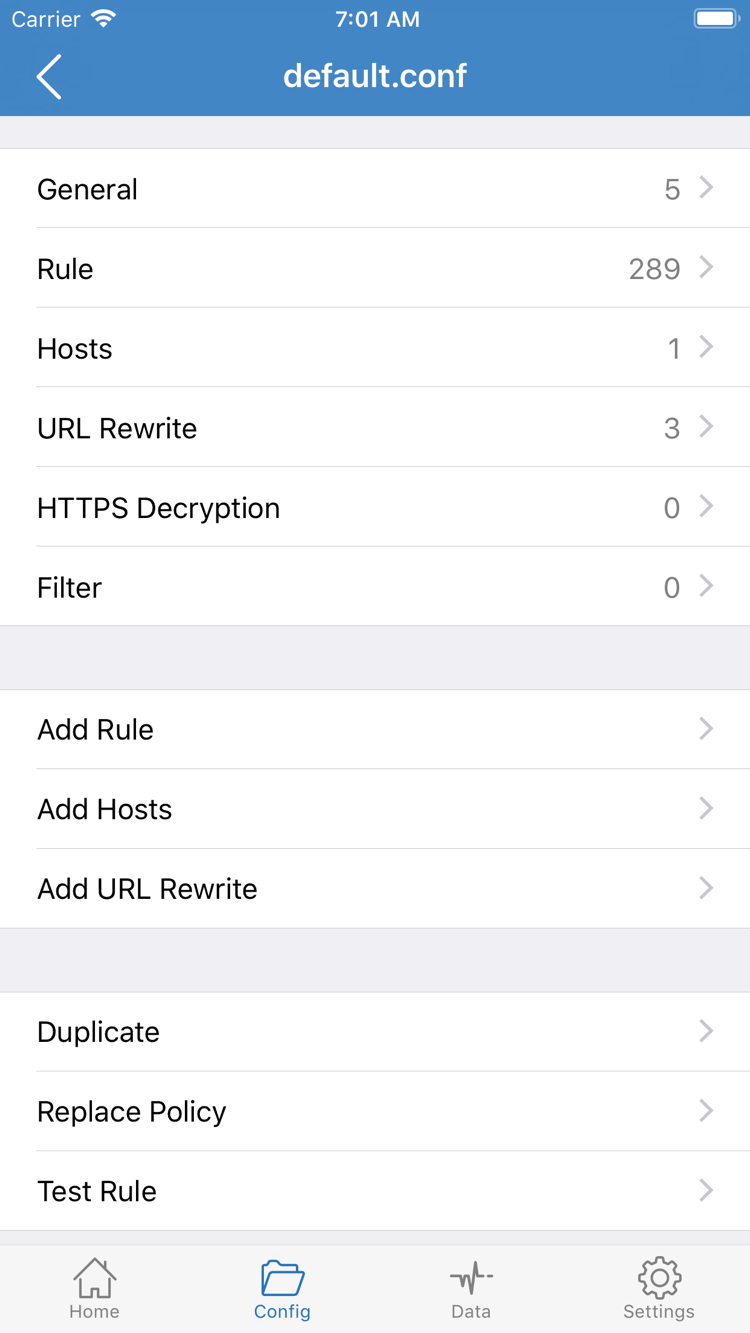
Open Config to view the configuration files and see which one is selected. Open a file’s edit screen to view sections such as General, Rule, and Hosts. The official screenshot on the right shows the configuration editor, not the Global Routing menu on Home. Opening or editing a file does not make it the active configuration. Return to the list and check which file is selected.
You don’t need to open Add Rule on your first pass. If a configuration came from a source you trust, read its documentation and keep the original file. Rules are usually matched in order, and an earlier match can determine how traffic is handled. The final rule alone doesn’t tell you that every website will use the same server.
For example, DOMAIN-SUFFIX,example.com,PROXY applies the PROXY policy to the matching domain suffix. FINAL,PROXY handles connections that weren’t matched earlier. These examples explain rule behavior; they aren’t instructions to replace your entire configuration. See the glossary for more rule keywords, and the options manual for details on Config and Settings.
By the end of this step, you should know which mode is selected and what result to expect. If you’re only checking a newly added server, note the current Config state, then temporarily select Proxy. After testing, restore Config if that’s what you need. Change one thing at a time to distinguish server issues from rule issues.
Step 03 / Establish the System Connection
Home: Select a Server, Then Turn On the Connection
Check the selected entry and routing mode before approving the system VPN configuration. Authorization, establishing a connection, and accessing a destination are three separate steps.
On Home, select the entry you want to test under SERVER or in a subscription group, then confirm that the selection marker is next to it. A server appearing in the list doesn’t mean it’s the one currently in use. If you’ve just imported several groups, select one and avoid switching during the test so you can interpret the results.
- Check that Global Routing matches your test plan, then turn on the connection switch at the top of Home. When disconnected, you may see a status such as Not Connected at the top.
- The first time you request a connection, the system may ask to add a VPN configuration. Make sure the prompt was triggered by the Shadowrocket action you just took, review it, then tap Allow and complete device authentication as required.
- Return to the app and check whether the status and switch at the top remain on. If the switch turns off again soon after, keep the error message and go to Settings and Troubleshooting on this page. Don’t repeatedly approve the request.
Approving the VPN configuration lets the app handle connections through the system network extension. It doesn’t verify your server details or guarantee that a particular website is accessible. If you previously denied the request, follow the prompt when you turn the connection on again. If needed, check the relevant VPN entry under Settings → General → VPN & Device Management. Labels may vary by system version; use the names shown on your device.
Don’t delete management profiles for other purposes while checking system settings. If your device is managed by an employer or school and is restricted from adding a VPN configuration, check the device management requirements rather than repeatedly changing server fields in the app. Permission to add a configuration and the availability of a remote service are separate issues.
Once the connection switch stays on, continue to the next step and test actual access. The system VPN indicator only shows a connection state; it can’t tell you which rule was matched. If another VPN connection is active, first determine which connection is handling network traffic before checking Shadowrocket. Don’t draw conclusions from the status bar icon alone.
Step 04 / Check the Actual Result
Connectivity Test: Check Results Alongside Actual Access
After turning on the connection, first make sure your Wi-Fi or cellular network can access the internet. If the network requires a sign-in page, complete that authentication before returning to Shadowrocket. Otherwise, a failed subscription fetch, test, and webpage load may all stem from the same network issue—not necessarily incorrect server details.
Run an In-App Test, Then Open a Destination
- On Home, tap Connectivity Test and wait for the current test to finish. Check the result for the selected entry. Don’t switch servers or change Global Routing during the test.
- If you’re unsure what a result means, open Settings and check Test Method. Different methods test different layers, so interpret the result based on the selected method rather than treating every number as real-world webpage speed.
- Open Safari and visit a destination you know how you expect it to be handled. Try refreshing the page or opening a new one. Interpret the result based on the current mode, and don’t rely only on a page that was already loaded from cache.
A test result means only that a response was received under the conditions of that test. It doesn’t prove that the entire proxy session, DNS resolution, or every website request will work. Conversely, a failed test alone doesn’t prove the server is unusable in every situation. Check the test method, then assess actual access and error logs. This is usually more useful than repeatedly running the same test.
In Config, Check Which Policy Matches
If Config is selected, test one destination expected to use DIRECT and another expected to use PROXY. Both loading successfully doesn’t mean they took the same route. To investigate further, check the available connection records or Log in the app. Compare the destination domain, matching rule, and policy result. Available log fields depend on what the current app version provides.
If a destination works in Proxy but fails after switching back to Config, check the active configuration, rule order, and DNS settings first. There’s no need to re-enter all server details right away. If it also fails in Proxy, keep the mode unchanged and check the selected server, its details, and the underlying network. This helps separate a remote connection failure from routing rules not behaving as expected.
Step 05 / Troubleshoot by Failure Stage
Settings: Keep Existing Values and Change One Variable at a Time
First identify whether the failure happened during import, authorization, connection, or access. Then decide whether a setting needs to change. Don’t turn on every switch at once.
No Server Entries After Import? Check the Fetch
If saving Subscribe doesn’t create any server entries, check that the URL is complete, the current network can reach it, and the subscription is still valid. If the address opens in a browser but import fails, confirm it points to subscription content, not an account management page. Changing Global Routing generally won’t fix a subscription format or authentication issue before any server entries have been retrieved.
Don’t keep adding the same URL to try to fix the problem; it can create duplicate groups that are hard to distinguish. Keep a copy of the original details and note the error shown in the app. To check the URL format or expiration, consult the source of your existing service details. Before deleting and re-adding a subscription, check whether it contains any information you’ve edited manually.
Entry Exists but Won’t Connect? Check Details and Authorization
For a manually added entry, check Type, Host, Port, and authentication fields one by one. Look for spaces added during copying, case differences, and missing transport or TLS parameters. Requirements vary by protocol; don’t assume default values from another type’s form are required for your service. For subscription-generated entries, try updating the original subscription and checking the result before editing multiple fields directly.
If the connection switch won’t stay on, check whether system VPN authorization is complete and whether the app reports a connection error. A denied authorization request and a server refusing a connection are different failures. If you accidentally deleted the relevant VPN entry, try connecting again from Shadowrocket and follow the system prompt. For managed devices, follow the device management requirements.
Connected but Can’t Access a Destination? Check Rules and DNS
First, make sure the current mode isn’t Direct, then recheck the selected server on Home. If only some domains fail, note the destination and what happens—for example, DNS resolution fails, the connection times out, or some page resources don’t load—then check the route in Config. Don’t change every DNS option just because one page won’t open, and don’t enable HTTPS Decryption just to troubleshoot.
DNS determines how domain names are resolved; routing rules determine how connections are handled. Both can affect the result. To compare Config with Proxy, note the original mode, test the same destination on the same network, and then restore the original setting. Change only one thing at a time so you can tell what made a difference. For more on DNS, rules, and logs, see the options manual.
In Settings, Understand an Option Before Changing It
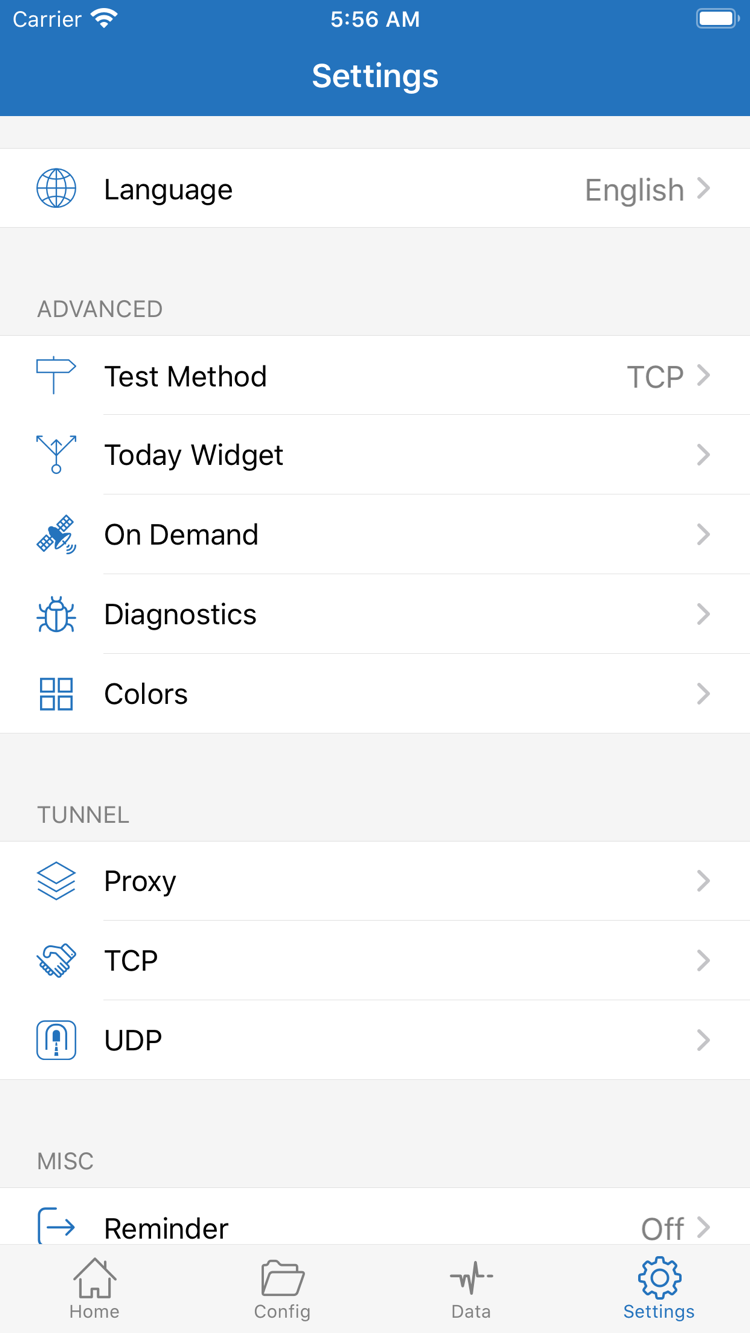
Settings in the official screenshot includes Test Method, Today Widget, On Demand, Diagnostics, and Proxy, TCP, and UDP options. Test Method affects how to interpret connectivity test results. On Demand triggers connections based on conditions; set it up after manual connection has been verified. Today Widget is for quick access, not a way to fix server connection problems.
Diagnostics can help gather clues, but focus on one specific failed action at a time. Note the steps you took, then reproduce the issue. Avoid switching between several servers and ending up with only the last message to review. Before sharing logs, remove full subscription URLs, passwords, credentials, and other private details. This guide doesn’t ask you to share them publicly.
Once an existing server provides the expected access, keep those reproducible settings and enable On Demand or other convenience options gradually. Use the verification steps on this page when retesting; there’s no need to repeatedly delete the app or rebuild the entire configuration. For purchase, authorization, and subscription update questions, see FAQs. To compare Subscribe, Config, PROXY, and DIRECT, consult the glossary.